October 14, 2011

Greek roasted aubergine and feta salad

 IMG_0844

Over 10 years ago I spent some time in Greece at a close friend’s house. At that time I was pursuing a completely different career, far from the culinary world. But already one of the things that fascinated me most during my stay was watching my friend’s mom cook. She was a brilliant cook, from her I tried (and did my best at learning) the best spanakopita I have ever had, phyllo also from scratch! amongst other things. The family had a restaurant and one of the things that was love at first bite was “melintzanosalata”, the Greek take at a dip like baba ganoush. It literally means aubergine salad and even more than on baba ganoush (or muttabal)  it’s focus is further on the aubergine, the smoked flavour of the aubergine in particular. That was the first time I ever encountered that “smoky” taste, I didn’t even know how they achieved it, but it blew me away.

Since, I am addicted to that flavour, which they later showed me it was imparted by roasting the whole aubergines over coals (I’ve achieved it by roasting it over flames, see the photo below). Anyhow, the dip was simply that smoky aubergine flesh, a tiny bit of garlic, lemon juice, a tiny amount of olive oil and after analyzing the dip day after day biting into tiny white speckles scattered in the creamy dip, what I figured to be feta cheese (here is a simpler version without the feta); all barely adorned with chopped fresh parsley. Aside from that dish, my friend’s mom also made a dish she named “melintzanosalata” by roasting the aubergines, opening them in half and turning the flesh into a paste quickly grating with a fork and mixing the same ingredients over it for a more appealing presentation served with red peppers roasted at the same time. It was heavenly!

IMG_6229

Since this week I’ve been compulsively testing a few recipes that just don’t get where I want them to be, I present you that simple yet super tasty version of that melintzanosalata. You’ll find that not much explanation is needed as it’s a very simple dish which just involves roasting (whole or halved) seasoning to taste with salt, lemon juice and olive oil, that bit of garlic and scattered feta and some fresh herbs. Just decide if you’d rather roast whole for smoky notes (and less than 10 minutes once the fire is going!) or halved in the oven to not even waste the skin!

IMG_0850

Roasted aubergine and feta salad

2 aubergines

1 red pepper

salt & pepper to taste

1 small clove of garlic

40g olive oil plus extra to finish

drizzle of lemon juice

about 50g greek feta cheese (more or less to taste)

fresh parsley or oregano (I also used some lemon thyme)

If you are going to roast the aubergines in the oven, turn the heat on to about 220ºC. It’s pretty high so the aubergines roast rather than stew). Halve them, make 3 or 4 parallel cuts with a knife across the flesh (not reaching the skin) and repeat in the other direction to form a diamond pattern.

Brush the 40g of oil amongst all halves. It’s generous so that the aubergine cooks to a meltingly soft texture, without the oil it dries up and feels spongy. Then, season with some salt and pepper (just take into account that fetta is fairly salty, so don’t be overly generous!)

IMG_6561

Roast with the pepper on the side over some foil to avoid dirtying the oven. I made more peppers for other dishes…

Imagen1

Roast the peppers until blackened on the outside or very blistered so it get’s buttery soft inside and very flavourful.

Roast the aubergines for about 25-30 minutes or until nicely golden and soft (sorry I forgot to take a shot!)

Serve on a platter, board or dish (or even on the baking dish if it’s nice looking!) grate the tops with the tips of a fork and taste to make sure it isn’t bland, in which case add a bit more salt…then will come the feta!

Finely grate a garlic with a microplane or pound well to a paste (otherwise you’ll get chunks that are not nice to find) and distribute amongst all halves.

Drizzle a bit of lemon juice, scatter the feta over, the peeled and chopped pepper and herbs of choice (as you know I like coriander a lot…well, here it goes well too, just a different flavour, not so mediterranean but still good). Drizzle with olive oil and serve!

If you prefer it cool, you can roast the aubergines a day ahead and then just do all the seasoning and scattering when you are ready to serve. Easy, simple, quick and tasty!

IMG_0852

You can eat it all up with fork and knife…you’ll be just left with the stems of the aubergines!

IMG_6566

continue for recipe...

October 4, 2011

Late end of summer natural leaven pizzas

IMG_0672

It’s been a while since I last wrote. Since the end of summer I felt like everything was on an uphill road and as I’ve had a difficult time picking up the pace. I needed some time to disappear into my shell (I wonder if that has to do with the fact that I’m a cancer) to see things from a different perspective. I’m not there yet, but beginning to see the light, so it’s about time I get out and back into real life.

I have been cooking quite a bit, so I have some stories I wanted to share but had been put on hold. Like these end of summer pizzas, made with butternut squash and courgette blossoms and cherry vine tomatoes from our orchard (the only ones that made it, actually!). There’s an incredible sense of satisfaction and being rooted that comes from growing your own food; that paired with a making your natural leaven dough makes the result the ultimate comfort food for me. This is what these two pizzas are, all ingredients home-made or home-grown, even the ricotta, which rise this humble dish to the ultimate comfort food! So appreciated when that feeling is a need.

IMG_9685

I remember how I saved a few seeds from a butternut squash, sweet as honey and full of flavour that I bought last year that. This year Linguini planted them and though so far we’ve only picked up 4 squashes, I was amazed by the amount of flowers it produced! The plant grows spectacularly fast and if you can tell from the photo at each intersection a flower grows. So, each morning I visited the orchard, the ground appeared flecked with yellow spots from the fully blossomed ones that very day. It was incredible! And this is still going since June, so if you are after the blossoms, this plant is well worth it if you have some space.

butternut squash

For the pizza dough, after a try at a few different recipes, I’ve so far stuck with QJones recipe which he posted in “Madrid Tiene Miga”, but of course you can use any pizza dough recipe you like. I just liked the sweet touch from the fine semolina, the perfect slightly chewy crumb texture but crispy crust of this one made without added yeast but from a fresh very mildly sour leaven (that’s why I avoid using the word sourdough in this case, because it’s not sour!). I made a recipe for 250g of flour, which was enough for 2 medium pizzas.

I made the “unorthodox” ricotta (in between ricotta and mascarpone) a day earlier using Smitten Kitchen’s recipe, which I already mentioned in this post (aha, I just realised I even showed a picture of the first pizzas I tried!).

Late end of summer pizzas

For the chunky confit tomato sauce:

about 200g of fresh tomatoes

2-3 garlic cloves

2 tbsp of extra virgin olive oil

Also:

200g-250g of ricotta cheese 

freshly ground black pepper

8-10 courgette and/or squash blossoms

extra drizzle of olive oil

optional: some grated parmesan & some grated lemon rind (for the blossom pizza)

about 200g of cherry tomatoes

ideally: some fresh basil or oregano to taste (I had to do with dried oregano!)

Make your favourite pizza dough or buy a pizza base you like…Here’s the velvety texture of the dough, after an initial rest period without salt added (autolysis) and light kneading. Isn’t it beautiful!Then, it was left to almost double (bulk fermentation) and then, taking care to avoid degassing much, divided into 2, preshaped and then shaped into boules and left to proof a bit for about 30 minutes or retarded in the fridge until ready to use and then brought to room temperature before stretching.

pizza dough

If you do make the pizza dough yourself following any other recipe I do have a few recommendations:

1)I think much of the success is about using the right flours (or it has been for me), I find it best not too use a flour that is too strong unless you like a really chewy crumb!

2)if you like neapolitan style pizza, with some  cornicione and those burst slightly charred bubles, take into account that the more hydrated the dough, the more holes in the structure, so make a dough as hydrated as you can handle to shape comfortably for your experience. I’d say no less than 65%…even for this recipe I often add a bit more water (but that depends on the flour).

3)If you like the above mentioned texture and look, do not  use a rolling pin to stretch out the dough. You will get rid of all the work from the yeast by forcing all the gas out and get flat “sides” (unless that is what you are looking for, that is). You do not need to know how to flip the dough in the air or any fine moves, just generously dust both sides with flour to avoid stick and lift the disc of dough (after lightly flattening the center of the ball of dough) with both your knuckes and let the own weight of the dough do the rest. It does take a bit of practice…but who cares if it is not perfectly round, I find it tastes soo much better!;)

4)for a darn good crust a high oven temperature is key (most pizza ovens are about 400ºC) so get your oven as high as possible, so the dough puffs up and charrs on the surface as quickly as possible without drying out! Check out Jeff Varasano’s site for some excellent info and watch the Heston Blumenthal video that follows for the cast iron pan trick that really works (he is not an experience pizzaiolo for all those who might have criticised him, but the point is that the trick to get as close to that temperature without playing with your oven pirolysis system does work! I used this until I got a decent stone to retain good heat). Here’s the youtube link in case you experience any problems or want to watch the other 2 that precede.

Anyway, as for the toppings go, I use my favourite quick tomato confit sauce, similar to the one I used here either peeling and deseeding or not the tomatoes (depends on how much time I’ve got :) either is good! I often prefer to peel by blanching and not bother deseeding because the skin dries up a bit and is more noticeable, but if not, you can leave as it is or pass through a food mill.

So, slowly fry the chopped up garlic cloves (or leave whole, just lightly crushed to release their flavour if you cannot bother with chopping) just make sure the heat is low so they release their flavour but don’t colour. Then, add the chopped up tomato, raise the heat, cover so that the tomato flesh softens quickly, then, remove the cover to evaporate until the oil begins to separate again!Tasty & quick!

IMG_6522

Time to get your pizzas ready for the oven, full blast (mine goes up to 275ºC (or so it says in the thermostat! but if I can get it to 250ºC I’m happy) I just preheat the stone and place it on the top third so it is closer to the grill.

For the squash blossom one, once the dough is stretched cover lightly the bottom with the cooled tomato sauce, distributing it so it is a thin layer and leaving 2cm off the edges clean so the cornicione raises properly. Scatter knobs of ricotta here and there, place the thoroughly washed blossoms over in a pattern you like or just not arranged and season with some salt, pepper and a light drizzle of olive oil. Also,if you like some finely grated lemon rind and some shaved parmesan.

pizza blossom

In it goes while we prepare the next one!

Cover the bottom with ricotta, also a light hand. Then, charr your tomatoes using a torch! An excellent idea I learnt the blog Ideas in Food and used to get that charr flavour and look in this pizza that won’t be enough time in the over to give that colour!

IMG_0658

I was amazed with the results! The tomatoes get a bbq flavour but become soft and this brings out their sweetness (Ok, these were good tomatoes) but the flavour and texture this charring exposed is beautiful!

Since I was left with some tomato sauce, I scattered that bit around and then the tomatoes. Finally I seasoned with the pepper and oregano (some fresh herbs would be nicer!but didn’t have any at the time!) a drizzle of oil and ready for the next batch after the first one came out!

IMG_0660

In and out it goes!

pizza burnt cherries

I didn’t get to take a photo of the crumb, but here’s one of the previous batch. I’ve been needing a lot of comfort food!:)

IMG_0649

continue for recipe...

September 7, 2011

Inspired by Ottolenghi’s french beans, hazelnut & orange salad

IMG_0386

Have I mentioned that amongst the cookbooks I have, one of the most valued ones is Ottolenghi, The Cookbook…along with his younger brother Plenty! :) I think there’s not one recipe from the book I’m not inspired by. Everything is so vibrant, the ingredient combinations are fantastic, the looks so appetising and colourful. For anyone who doesn’t know it I strongly recommend you flick through its pages just to get a feel of his philosophy of cooking. I got to know it through this post on Delicious Days featuring the almighty aubergine (probably my favourite ingredient) and decided to buy the book after a look at a few recipes. When it arrived and had a quick look at it…I didn’t know where to start, I wanted to have a go at everything!!!Still haven’t got around to visiting the “restaurants” but just to say that I just want to go to London to visit Ottolenghi! So, when I do get to do so, I will definately share the experience, which I am sure will live up to the expectations!

IMG_9659

Anyway, about this salad…this year Linguini decided to have a go at planting quite a few vegetables: various tomato varieties, courgette, butternut squash (from the seeds of one we ate and loved), peas and beans. Some have grown beautifully, others not quite as well! It’s such a pity after all the time and care that went into them, to watch how most of the beautiful pea plants after flowering begin to wilt irreversibly from a sun overdose. They are picky, those ones…we did get to try a few pods (five to be exact!)and they were just like candy, straight from the pod. The beans have done so-so, began growing at incredible speed and then some made it through, others weren’t so lucky. But we did get to pick 3 or 4 handfuls of them…

The moment I got the first one, I knew I had to try this salad, which from the moment I saw it I knew I’d love. And like every other recipe I have tried, it was just a perfect match of ingredients! The crunchy very lightly cooked fresh beans with the earthy flavour of the nuts and it’s oil and the citrus punch of the orange rind. All plainly seasoned with freshly ground black pepper and maldon salt…simple yet perfect. The original recipe also includes mangetout, which I love (I would have added them lightly sautéed rather than boiled) but having just Linguini’s tender beans at hand, I didn’t miss them. So, I’ve repeated the salad, with the last handful of beans, the late ones the plant still offered us, for you…and for us to enjoy again!Hope you like it too!

 IMG_0340

French beans, hazelnut and orange rind salad (adapted from Ottolenghi)

400g of french beans

50g of hazelnuts

the rind of 1/4 of a large orange  (more or less to taste)

1 garlic clove, crushed (optional)

hazelnut oil* and olive oil (about half of each) to season to taste

freshly ground black pepper

maldon salt or another fleur de sel, ideally

(the original recipe also includes mangetout and some chives, which I skipped)

*This is the oil I used, From Percheron Frères, a fantastic brand, if you can find it.

judias 2

So, this salad is as simple as lightly boiling the beans (you can leave them whole or slice in two if you like them smaller) in plenty of unsalted water for about 3-5minutes,(more or less depending on how large the beans are) just enough time to retain a crunch and to plonge them in iced or running cold tap water to keep their vibrant green colour. Once cool, drain and dry.

For the hazelnuts, since I tried these unshelled hazelnuts from a trip to Asturias and realised the flavour and how well they keep, I do not buy shelled ones. So, that’s the only bit of work…worthwhile I find. So, just shell them and roast them in the oven, when ready, they peel very easily. Let them cool before mixing with the other ingredients.

Remove the orange peel in long thin strips (trying not to get any of the white skin, as it is bitter) or cutting it off before slicing finely.

IMG_0336

Finally, just mix, season with the oils, salt and pepper to taste and serve! If you are not going to serve right away, it’s best to keep the ingredients separate, so the hazelnuts retain their crunch, or at least to avoid seasoning until the last minute.

Con appétit!!!!

IMG_0372

continue for recipe...

September 1, 2011

Rosemary rösti crust…A healthy & tasty alternative to a pastry based quiche

IMG_0528

I’ve taken this month off, the truth is that I still feel “off”, someone close to us has passed away and it has shattered our world. I cannot remember having truly dealt with this sort of grief before…memories, many of which I was anaware of have striked me, to make me reconsider attitudes, priorities, to live in order to not regret. I don’t want time to slowly wash away these feelings, to wipe those ideas as our everyday race engulfs us in its maelstrom. But, I’m also literally out of breath, I have difficulty breathing from this whirlpool of emotions. Nothing time won’t heal, but I need time, so I’m taking it slowly…

Anyway, I meant to publish this quiche a few weeks back which is when I first tried it and fell in love with the possibility of substituting the usual “pâté brisée” used as a pastry base for most quiches and tarts with this flavourful, cheaper, healthier and quicker alternative!!I was browsing through food photographs by Con Poulos when I came across one of quiche that caught my attention for the rustic look of the crust that linked to this recipe site. I read about the shredded potato crust and though I love röstis it hadn’t occurred to me to use it as a quiche base!

I decided to give it a try with the belief that although tasty, the cream base would pour through the base (which honestly wouldn’t matter much as you can even make quiches without a crust -call them flans or puddings- but in this case it would get soggy rather than the nice crunchy contrast). I sticked with the recipe main filling ingredients, that is mushrooms and spinach, because I had liked the looks, but of course you can change them to whatever is in season or you like, like cherry tomatoes, bacon & onion, roasted rep peppers and goat cheese, the possibilities are endless and up to you. I just changed the cream base to one more to my liking (the original recipe was low-fat…I’m not so concerned in making it such) and made the rösti base my way, skipping the chopped onion part to make it quicker, not adding any cornflour but using floury potatoes instead for a crisper but lighter result and adding some garlic and fresh romesary to flavour the potatoes…that went beautifully with the mushroom filling, I find.

So, here it is, I hope you give the crust a try, because it is an excellent approach to making quiches, add to it any flavourings available to you according to the time you want to spend to make it. For a quick rösti crust, just spice it with something that goes well with your filling, fresh herbs (I’d love to try sage, for instance with a ricotta and spinach tart…like traditional raviolis!)or dried ones, some pastes (like red pepper paste), slowly fried onion and bacon…Pick one, you won’t regret it!

Spinach & mushroom quiche with rosemary & garlic rösti crust

For the crust:

aprox 450g  peeled floury potatoes

1-2 tbsp of olive oil

3-4 whole garlic cloves

some fresh rosemary, finely sliced

salt and fresly ground pepper, to taste

For the filling:

150g of cream (or up to 200g if it fits your mould)

2 eggs

more salt & pepper to taste

50g or more of a cheese that melts ( I used Arzúa Ulloa, which I’m addicted to)

200g of mushrooms (I used portobello, but if you have a tastier variety, even better!)

250g of fresh (baby) spinach

some more sprigs of rosemary

IMG_0467

Begin by grating the peeled potatoes with a coarse grind

IMG_0471

Season them to taste with the salt & freshly ground pepper and the finely  chopped up rosemary (if you choose to use it)

IMG_0478

Preheat lightly a 26-28cm skillet (if you haven’t got one, in any case I’d go bigger, to make sure you get at least 2-3cm sides on a 22cm quiche mould.

Add the bit of olive oil and add the seasoned grated potatoes together with the garlic cloves lightly smashed to release their aroma & flavour.

Give it a few turns to flavour the potato and soften (cook) it lightly and spread it evenly over the base and remember to remove the garlic cloves :)

rosti quiche 1

It is IMPERATIVE, that your pan is non-stick, or at least very helpful, as the cooked potato pancake will slide off easily, otherwise you may go through hell!!So, if it isn’t I suggest you cure it with some salt so the potato doesn’t stick

Cook over medium heat for about 10 minutes, until you get a light golden colour on the bottom and invert over the greased (with olive oil) quiche pan. I lined it with some parchment (just in case) but it would have come out without a problem).

IMG_6459

Bake for about 15 minutes on a 180ºC (fan-assisted)  preheated oven to get again a golden colour (lighter to how you like it). Take into account, that it will need about 15 minutes more with the filling to cook, so if left to the colour you like blind baked, it will get too dark later.

Meanwhile prepare your filling ingredients, in this case, sauté the spinach in batches in a drizzle of oil, remove excess water by pressing against a strainer and season as instructed here.

Sautée the chopped mushrooms, with some more garlic cloves and rosemary if you like over high heat with little olive oil. Again, just remember to remove them once finished.

IMG_6462

And mix the eggs and the cream and set aside to season just before filling.

When the crust is ready, assemble it, adding some of the greated cheese in the bottom to impermeabilise the crust a bit and distributing the rest of the ingredients to finally pour in the seasoned quiche cream mix almost up to the rim.

IMG_0485 IMG_0491

IMG_0498

Bake until set, which will probably take 15 more minutes. If you like a paler look to the top, simply lower the temperature to 150ºC and just cook longer until set.

Ready to enjoy! Let cool or serve inmediately!

IMG_0542

continue for recipe...

August 12, 2011

Kısır…a tasty fresh turkish bulghur salad

IMG_0448

I discovered this recipe, for most “the turkish version of tabbouleh”, from Ottolenghi’s cookbook Plenty (one of my favourite cookbooks together with his first book). I searched for it on the web to learn more about this dish and found two photos that didn’t make it to the print, but that speak for themselves, one in his own blog and another in his The Guardian Column “The New Vegetarian”. I’ve got to admit, that I am quite visual, so I get more inspired by photos than usually by recipes. As soon as I saw it, I knew I had to try it!

Not that long ago, I had bought some different grades/coarseness of bulghur wheat to play around my take on tabbouleh, for which I undoubtedly preferred the fine grind. I’ve read various recipes in which they suggest the use of cracked wheat instead of bulghur, for those who may be confussed as to the difference between the two. As far as I know, bulghur is durum wheat kernels, bran removed, parboiled and then dried and cracked to different sizes. Whereas cracked wheat is just that cracked wheat, meaning it isn’t previously cooked, so it will take longer to cook. So, if you do use cracked wheat for any of these recipes, count on longer cooking times and more liquid to hydrate it.

 IMG_6467

Anyway, about the coarseness I’ve chosen for this salad/side-dish, although I’ve read that it is often done with fine bulghur, I preferred the bite the coarser grind brings much better. Plus, since in Ottolenghi’s recipe a “sofrito” is made rather than all ingredients mixed into the cooked wheat, the coarser bulghur absorbs more flavour and stays well separated to be then mixed with all the herbs and vegetables of choice. The only BUT is that I was missing two ingredients from Ottolenghi’s list: the pomegranate molasses (which are used in the south of Turkey to season this dish instead of the lemon juice to give it it’s sour notes)…PLEASE anyone who knows where to find sour pomegranate molasses in Spain, let me know!!!I’ve been looking for it for over a year, no joke! And the other, which is also for looks are the pomegranate seeds, now expensive and not in season…so I used some broken up walnuts instead, which I find go really well!Other than that, all I can do is INSIST you give it a try, it won’t disappoint you!

IMG_0420

Kısır (adapted from Ottolenghi’s Plenty recipe)

(enough for 4 generous servings)

400g of coarse bulghur

2 medium onions, finely chopped up

optional: 1 garlic clove

about 75g of olive oil, plus extra to drizzle to the finished salad

1,5 tbsp of concentrated tomato purée (I used this)

1/2 tbsp of red bell pepper paste*

3 medium tomatoes, peeled and diced

optional: some cherry tomatoes cut in half or more fresh tomatoes diced

200g of water (he uses much less, but also suggests the medium bulghur)

1 tsp of ground cumin

salt and freshly ground black pepper to taste

about 2 tbsp of lemon juice or to taste

a handful of parsley, lightly shredded

a handful of mint leaves, lightly shredded

1 spring onion or the tender stalks of 3 or 4

a handful of walnuts, broken up a bit

*Ottolenghi does not use this paste, which is traditional in this dish, but instead adds green chillies. I substituted it for Harissa hot sauce. But if you have neither, just use 2tbsp of tomato paste and some dried chilli flakes to give it a quick!

Now, for the super simple recipe, make a sofrito with the onion, finely chopped up in brunoise and the olive oil (and the garlic, if you like, I didn’t add any either here or when seasoning). Cook over lowe heat until the onion is soft and translucent.

Then, add the tomato and pepper paste, cook a little bit and add the chopped up tomatoes and further cook for 5 minutes or so. Add the water,season to taste and bring it to a boil and stir in the bulghur. Inmediately, turn the heat off and cover so that the liquid get’s absorbed and the bulghur softens a bit, for about 15 minutes. It should get “al dente”, neither crunchy not mushy…so it’s always best to err on the crunchy side, as you can add more boiling water and cover to soften some more to taste.

kisir1

When ready, leave uncovered until it comes to room temperature. Then, season to taste with extra salt if needed, pepper, the cumin, the lemon juice and pomegranate if available...it should be slightly on the soury side, to bring out that freshness. Add the finely sliced spring onion, the broken up walnuts and when ready to serve the herbs lightly shredded or whole if the leaves are very small like in the picture. If you like, you can also add some finely chopped up cucumber or more tomatoes.

IMG_0461

continue for recipe...

August 2, 2011

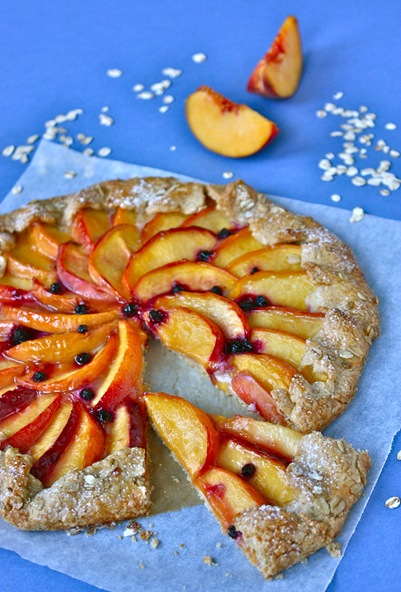
Peach, nectarine & ricotta galette on wholewheat & oat pastry

  IMG_0213

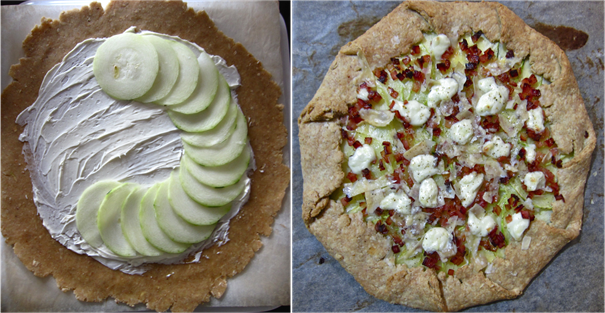
I really like galettes, savoury or sweet, they are really easy to put together and like pizzas are a good base for many combinations of seasonal ingredients. Last week I made a pâte brisée (savoury dough) to use up some courgette we had picked up from the orchard. I used the ingredients I had at hand: some wholemeal flour along with AP flour and I though of using up some rolled oats that have been sitting in the pantry for a while. As a filling I made a base with an “unorthodox” ricotta I’d made following Smitten kitchen’s recipe (in between a ricotta and a mascarpone really), the finely sliced courgettes scattered with some bacon that was close to it’s deadline! We absolutely loved the results! The dough was crispy and buttery, also you could really taste the toasted oats. The touch of ricotta made it really soft inside, which contrasted beautifully with the light crunch of the bacon bits and parmesan shreds put over the whole thing. But…I didn’t get to take pictures of any of it!

IMG_0210

So, I gave a try to the sweet version of the dough, just incorporating some sugar and grated lemon rind (you could use orange instead…and I might even prefer it, but didn’t have any!) and as a topping some summer peaches and nectarines…over a bit of sweetened citrus ricotta as well. Here’s the result…I wouldn’t change anything other than perhaps the orange rind for the lemon one! I must say that I love summer fruit sooo much that I am always reluctant to alter it in any way to make desserts (other than the juices of citrus fruits for curds and such) except if transformed into shakes (frozen pulp sorbets), lassis (iced yoghurt drinks) or sorbets. But, this is one of the few exceptions…

I used the ricotta, because it’s what I had at hand, but an overnight drained greek yoghurt, crème fraîche or mascarpone are great alternatives…or you can just skip it altogether as the fruit on it’s own is good enough plus you can season it with spiced or rinds to taste!I also topped it with some blueberries I have frozen, if you like the looks or contrast, you can add any berry before or even after baking. Dust with icing sugar if you have a sweet tooth and you like how it looks at the end…and enjoy the contrast of the crisp toasted oat dough with the creamy citrus ricotta and luscious baked fruit!

IMG_0156

Peach, nectarine and ricotta galette on wholemeal & oat pastry

(for 1x25cm diameter galette)
IMG_0223 

For the pâte sucrée:

60g wholewheat flour

60g AP or cake flour

20g rolled oats + extra for sprinkling

70g ice cold butter

35-40g sugar (or more to taste)

1 cold yolk plus some of the white or ice-cold water to make 30g

pinch of salt

some finely grated lemon or orange rind to taste

For the ricotta:

80g ricotta

grated rind of about half a lemon or some orange

aprox 5g of icing sugar or to taste

drizzle of lemon juice, to taste

For the peach/nectarine filling:

1 medium nectarine+ 1 peach (or 2 of either)

10g sugar, to season or to taste depending on how ripe the fruit is

aprox 5g of cornflour

drizzle of lemon juice to taste

If you are willing to make your ricotta/mascarpone yourself refer to the smitten kitchen recipe. I used 750g of pasteurised whole milk (not UHT)+ 250g of whipping cream (35% fat) with a bit of salt. Warmed up both to about 85ºC and added 2 tbsp of lemon juice.

ricotta1

The first time I prepared it, I expected it to curdle much more, so thinking it wasn’t enough, I kept adding lemon juice. The result was nice but on the soury side, so the times after that, I’ve just added enough juice to see the curds forming and tasting to make sure it didn’t feel sour. If you want some more info on this, I found this link on Serious Eats quite enlightening, though the drainage times vary considerable depending on what type of cheesecloth you are using!Still, I find it quite cool to make and it can find various uses, like these zucchini flowers&ricotta pizzas!

IMG_0661 IMG_6303

Ah, and here is the courgette galette phone shot before being devoured!
galette courgette2

As you can see, it’s the same idea.

Anyway, back to making the ricotta…Once enough lemon juice (or any acid, for that matter) is added, let it sit a few minutes and strain over cheese or butter cloth. I have this cool really fine mesh coffee filter that cost me…about 0.50€, well worth the investment ;) I always use it to strain stocks leaving almost no impurities! It works like a charm! And just strain it for as long as needed to get the consistency you like. As simple as that!

ricotta

Then, just whip the amount in the recipe (or more if you want a thicker layer) with the sugar, lemon or orange rind and lemon juice and set aside.

Prepare the pâte sucrée, which is the sweet counterpart of a pâte brisée. The sablée is usually sweeter but always has more fat, in the form of butter and egg yolks rather than ice-cold liquid, be it water or milk or…I always use the following mnemotecnic proportion and adjust according to the results I want: 4:2:1, that is 1 part flour, half of that of butter (or more for a sablée) and half of that of sugar. Then, I decide if I want it crumblier (with water or milk) or that holds better together (with some egg, as the proteins aid binding it. And always, be it sweet or savoury, a pinch of salt. Of course you can add any flavourings to taste or play around with the flours, like in this case. Does it help?

Anyway, I just put together the flours (I sifted the plain white one), and pounded lightly to leave some texture the oats (you could also increase the amount and reduce that of white or wholewheat flour).

oats&wholemeal

Now, the other key to making pastries…the mixing technique. You can use either of the two methods: “sablage” or “cremage”. The first, my preferred one most of the time, means mixing the flour and butter into crumbs resembling sand “sable” in french, thereby the descriptive name. Then, you add the liquids and if sweet, the sugar. The “cremage” as the name implies, which is used for sweet dough, means creaming the sugar and the butter until pale and that the sugar is dissolved, then adding slowly the eggs or liquid and finally adding the flour in 1 “coup” all together at once.

I prefer the sablage method, 1) because I find it quicker and easier and 2) because I like to leave the butter in pea-size bits not completely integrated resulting in a more puff-pastry texture. So, for this method, it is key that all ingredients or at least the butter and liquid ingredients are very cold. This is for two main reasons, namely so that the butter doesn’t melt and so that the gluten does not develop at all, resulting in that crumbly pastry. Also, this is why it’s in any case important with these sort of pastries to NEVER overmix once wet and dry ingredients are mixed independent of the method, for the more you work the dough, the drier and less crumbly it gets!

So, a quick trick I use is to place the whole piece of  butter in the freezer (in this case it was a can, so I had to scoop out pieces), dip it into the flour and grate it with a coarse grater, that way it wont stick and you will already get small pieces, so you will save time and barely any mixing is required. Or you can go the food processor route by chopping the cold butter in small squares and blend them to get the crumbs. Add the flavourings then, or rub them into the sugar that will be mixed with the liquids and mixed all at once barely kneading, just bringing the whole lot together into a ball. Then, just wrap in film and leave to rest for at least 30 minutes in the fridge (a bit more is better).

pate sucrée2

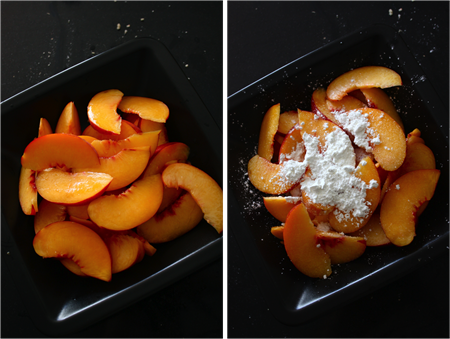
Cut the nectarine and peach by half to remove the stone and then cut each one into thin slices, depending on the size it will be about 16 slices. Season with the sugar, the bit of lemon juice and some cornflour to soak up the juices as it bakes and avoid making the pastry soggy. I usuall just sprinkle a bit to coat lightly, so if you feel you need more or less according to how juicy your fruit is, trust your instincts!
sliced peaches

After the the dough has rested, roll out over some parchment paper (as you can tell I reuse mine a few times!:) ) flouring as needed (removing excess, so you don’t get lumps of flour that will taste ackward when cooked) on both sides until you get a very fine (about 3mm thick) circle, it will be about 30-35 cm, which once the sides are folded over leave you a 25cm galette.

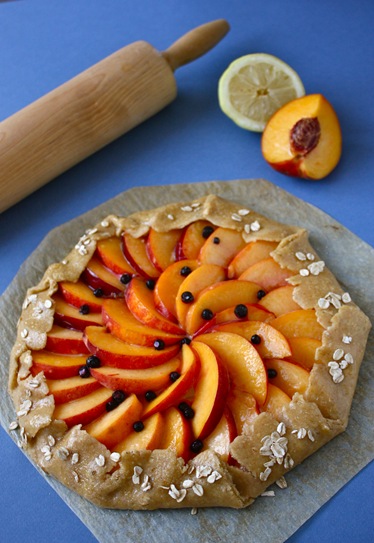
I like to rest the stretched out dough a few minutes in the fridge or freezer before filling it and baking it, but it’s not really necessary. Smear the seasoned ricotta over the surface, leaving about 3 cm borders free to fold in later. Then arrange the peach & nectarine slices in a decorative pattern or without taking too much care for a more rustic look (you can also trim the borders of the galette to make a clean circle or leave them…which I prefer unless you are making lots of small ones, which is more convenient to stretch and cut with a pastry ring cutter). Fold the borders in by segments, one after the other.

galette1

And if you like a shinier effect brush the borders with egg wash. Also, you can sprinkle some granulated sugar over and some extra oats for decoration.
IMG_0160

Bake at 180ºC for about 25 minutes, if the pastry is still not golden enough, you can lower the temperature to 160ºC and continue baking 5 more minutes or as needed.

IMG_0190

You can drizzle with some agave syrup or brush some peach jam as it comes out of the oven for a little shine. Let cool down slightly and enjoy!!

IMG_0203

continue for recipe...